The
drivers seat in the Santa Fe gives adequate leg room for most drivers by
sliding both forward and rear on its sliding rails. But there are some that
would like to have even more leg room and therefore this seat extension
modification addresses this issue. The modification can be
accomplished by one of the two ways outlined below. Modification version 1
adds extra leg room by way of adding metal extensions to the seat rails.
This type of modification was first suggested and performed by numerous
Santa Fe Forum members. Modification version 2 adds extra leg room by removing the tabs off the seat rails.
5/16"-18 and 17/64"
height, 1/2" width nuts (alloy 20 steel)
Time to perform
modification version 1:
Total time for mod version 1:
4 Hours
The following mod steps were
first outlined in the Santa Fe Forum by members scs00 and alphanstein and these
are their instructions. The original text can be viewed on the Santa Fe Forum in
the Install/How To?FAQ's section if it is still available. I condensed the
thread to only their mod text below.
Posted by
alphanstein on 12/07/2001.
I too used 1 1/4" wide and one 15" and one 18" rail at 3/8" think for a
stronger hold. I used cold rolled steel and sanded, primed and painted them
black.
I took the existing holes and moved them down the rails by 2". It meant i
had to drill two sets of holes in the front on both steel bars. In the rear,
I just drilled the same mounting holes for the rear mounts, but this meant I
had to drill new holes in the seat sliders, which was no problem. You can
see how in the rear, the seat sliders hang back a little, hence drilling the
new holes 2"forwards to align them back with the floor mounts. I had to
dremel out the holes in the rear to ensure they were not torquing the bar
like they did on my first attempt. i also need to replace the cheap zinc
screws I got from Home Depot with some real steel alloy screws that I got
from mcmastercarr.com. The zinc ones do not stand up to torquing.
I am using 5/16"-18 x 1"steel bolts (316 alloy) as replacements with spring
lock washers on the nut side and star lock washers on the bolt side (both
5/16"). The nuts are 5/16"-18 and 17/64" height, 1/2" width (alloy 20
steel).
The total mod with
painting took me about 4 hours. But the leg room that comes with and
additional 2 inches on the rails. I put the seat all the way back and I can
still fit in the rear behind the drivers seat, albeit my legs are open, but
still comfortable. (Photo by alphanstein)
Modification Version 2
- Removing Seat Rail Tabs
Difficulty level / scale:
On a scale of 1 - 10
Easy
Modification
Version 2
Difficult
1
2
3
4
5
6
7
8
9
10
X
Tools and materials needed:(Modification version 2 - Removing seat rail tabs)
5/16"-18 and 17/64"
height, 1/2" width nuts (alloy 20 steel)
Time to perform
modification version 2:
Total time for mod version 1:
90
min (If applying epoxy, then add overnight time as well).
The following mod steps were
first outlined in the Santa Fe Forum by members SwaveDave and enhanced by
numerous other members such as leedef, onigorishi and others. I condensed the
thread to only their mod text below.
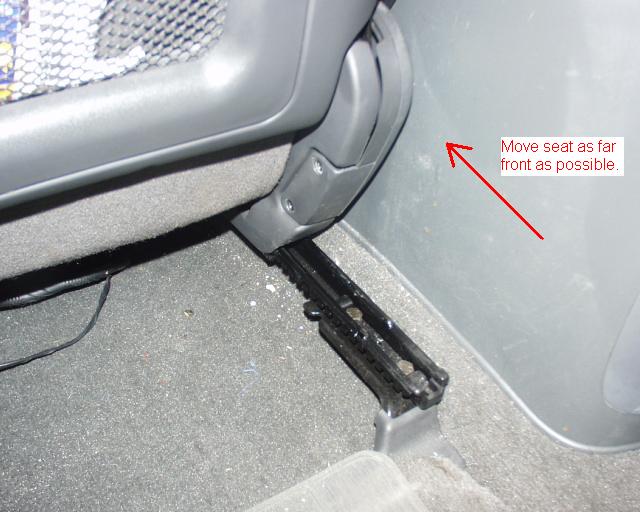
Step 1 - Move the
seat out of the way.
Move seat up all the way forward
on its track which will expose the rear metal stops toward the back portion
of the rails. There are two on each rail and stick up about 1/8" beyond the
top surface of each rail. (Photo by
twospirits)
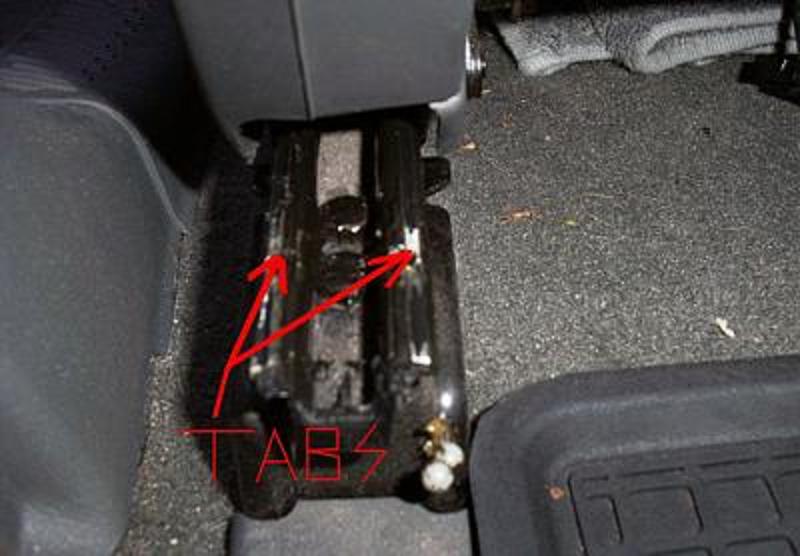
Step 2 - Identifying
the sections to work on.
There are two
tabs on each rail and stick up about 1/8" beyond the top surface of
each rail. (Photo
by leedef)
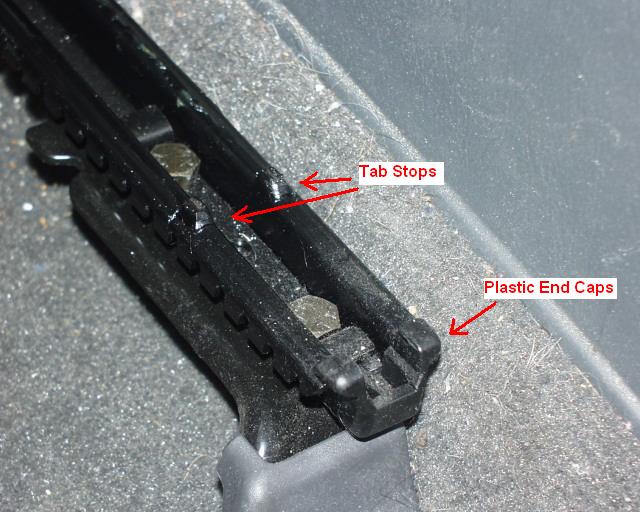
Another view
of the two tab stops as well as the plastic end stop caps.
(Photo by twospirits)
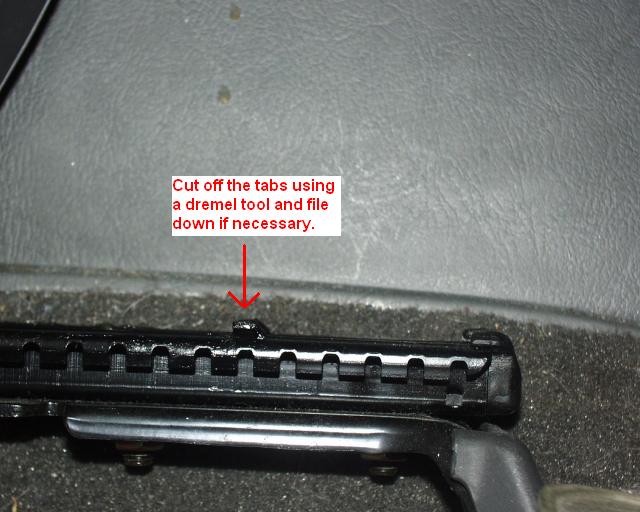
Step 3 - Removing
the tab stops.
Cut off the
tabs so they are level with the top of the rail. You can cut them off by
using a hacksaw, power saw but its best using a dremel tool. File them down
to the reach of the level of the rail, if need be. Use a regular flat file,
or a round drill attachment file. (Photo
by twospirits)
Step 4 - Clean and
prime the area.
Clean up the
little metal filings you made on the rails with a fine grinding wheel (again
using a dremel tool) and wipe off any dirt on the rails.
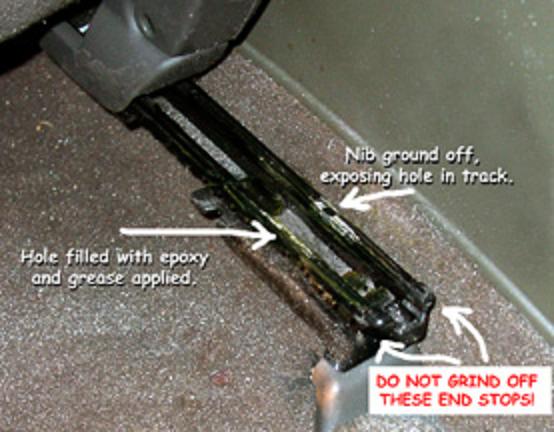
You will notice that once the tabs are cut off that there is a small hole
through the rails. You will need to close this hole or risk having some of
the white ball bearings fall through the hole and make the front and back
movement of the seat feel rough. (suggested by leedef)
(Photo by twospirits)
Step 5 - Closing the
exposed hole.
Filing in the
holes is easy using epoxy. The epoxy SFF member leedef used is your regular,
two part epoxy (Elmer's), which you mix equal portions (little fingernail
size blobs) mixing them thoroughly and glob into the track holes.
Let it dry overnight, then gently ground (file) it down. He also applied a
second coat and again smoothed it out. Finish it off by sanding it down with
fine sandpaper.
At this
point spray (fast drying) metal primer on the areas you worked on. After its
dried, use spray gloss black paint and allow to dry. (Note: Make sure you
use masking tape around the seat, middle console and carpet area so you do
not mess them up when spraying).
(Photo by leedef)
Step 6 - Final steps
and testing.
Once the paint has dried, apply a thin
layer of grease (spray type or gel type in a tube) to the tops of each rail.
(See above photo)
Slide the seat back a little, so you can remove the plastic fastener which
holds some wires located underneath the seat. Removing the fastener allows
the wires more freedom to stretch if you decide to move the seat way back.
Now sit in the seat and move the seat back as far as it will go a few times.
Go back and forth a few times so the grease on the rails gets spread
thoroughly.
Choose a spot that is most comfortable for you and make sure the seat
mechanism snaps into the rail teeth so the seat cannot be shifted once you
choose the best position for your legs.
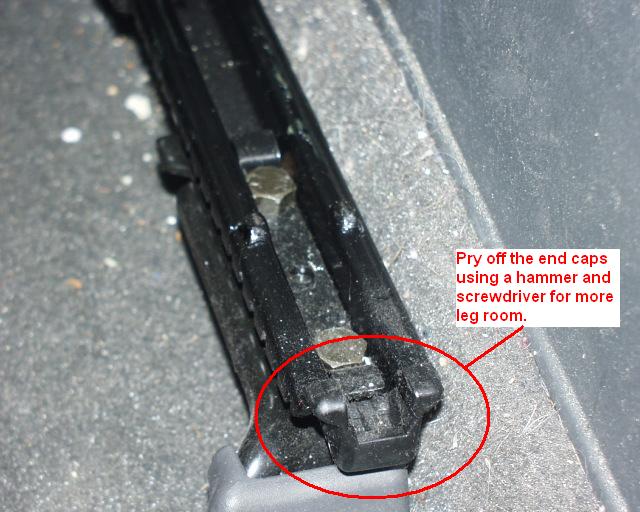
Further extension (for
the really tall person).
If performing
the above steps still has you craving for more legroom, you can still move
the seat further back by removing the plastic end caps at the end of the
seat rails. Note: Doing so will increase the legroom by another 2-4 inches
but would restrict any possible person to sit comfortably behind the driver
as well as possibly have the white ball bearing slip out if the seat is
pushed too far back. Use your discretion in this. If you still want to do it
then to remove the plastic end caps is quite easy since they are plastic.
You can use a screwdriver and hammer. They will knock off quite easily.
(Photo by twospirits)