The Hyundai Santa Fe HID kit Modification

Original idea: BMW circa 1991
Author of procedures: Robert Lobitz
Installer / Testers: Robert Lobitz
Images provided by: Robert Lobitz, www.hidxenonheadlights.com

Introduction / History

One of the hottest new things to add to your Hyundai Santa Fe is the HID (high-intensity discharge) headlights. These usual headlights have an amazingly bright and powerful glow, and they have a reach that is farther and wider than any traditional halogen bulbs. This is done by heating a special inert gas called xenon.

Although first seen in BMWs back in 1991, HID kits are quickly becoming more popular in all types of vehicles because of their stylish look and ease of installation. Because of its design, the kit does require installation of a special ballast that will up your Santa Fe existing 12v DC power to a rate that is to ignite the gas in the bulbs.

Along side the HID, there have also been a growing trend of people utilizing the LED technology, which are inexpensive, durable, and energy efficient. These lights can come in a wide assortment of colors and are often assembled into the shape of a ring that is set over a projector ring, or sometimes called a HALO. Together these two technologies will create a headlight with a bluish white glow.


The video to the right showcases the difference between standard Halogen headlights vs HID Xenon headlights.


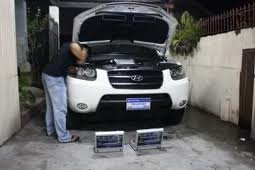
Even though the installation of a HID kit in your Santa Fe is relatively easy, it is wise to make sure that your working environment is safe by first making sure that you have turned your vehicle off, unplugged your battery, and waited until your engine has completely turned off.


Disclaimer
 
Please Read the disclaimer before proceeding


Difficulty level / scale: On a scale of 1 - 10

Easy   Difficult
1 2 3 4 5 6 7 8 9 10
  X                

Tools and materials needed:

Santa Fe HID kit (like the one from hidxenonheadlights.com)
Zip ties
Xenon bulbs

Time to perform modification:

Total time for modification: 30 minutes

Step 1: Preparing the work environment.

As mentioned above, make sure that your working environment is safe by first making sure that you have turned your vehicle off, unplugged your battery, and waited until your engine has completely turned off.

Step 2: Replacing the halogen bulbs..

In order to take out the old halogen bulb and replace it with a new xenon you will need to first locate the low beam dust cover. This can be found in the very back of the headlight assembly. Once you have removed it, which can be done by simply twisting it, you will have access to the old bulb. Unplug it carefully from the wiring.

To finish installation you will need to first find a safe and secure location to attach the ballast. It’s a good idea to remember a couple of points while doing this.

A: remember that your Santa Fe was not originally designed with the ballast in mind so you will need to find a location that it will be able to be securely attached but is out of the way.
B: you will need to keep the location of the ballast both close enough to the bulb so that it can reach, but also close enough to the wiring so that it can be connected there as well.

Step 4: Connect the bulbs and test.

After you have attached the ballast, connect the new xenon bulbs, but be careful not to touch the bulbs' glass.
After you have completed the installation of the bulbs, double check all your connections, including the ballast. When this is finished, test your Santa Fe's new lights.

Final views.


This site was last updated 12/01/11