The original install guide for Australian right handed drive models can be found here.

The Hyundai
Santa Fe Cabin Air
Filter Installation
(US Version)
| Original idea: | HMC and Geoff White |
| Author of Mod / Report: | Geoff White, twospirits (additional text-US version) and congo99 |
| Installers / Testers: | Numerous Santa Fe Owners |
| Parts Supplier: | Hyundai Motor Company |
| Images provided by: | twospirits |
Introduction / History
|
The Hyundai Santa Fe's that are sold outside the United States are equipped
with a Pollen Cabin Air Filter that filters out any odors and particles
leading to the fan/air conditioning unit ducts. This modification addresses
this oversight by installing a genuine Hyundai air filter into the empty
filter housing for US Models. The OEM filter is one that is made for the
Hyundai Sonata but fits into the same housing of the Santa Fe. Performing
this modification yourself will save you between $80-$120 US Dollars that it
would cost if US Dealerships were to do it. The original install guide for Australian right handed drive models can be found here. |
|
Disclaimer
|
Difficulty level / scale: On a scale of 1 - 10
| Easy | Difficult |
| 1 | 2 | 3 | 4 | 5 | 6 | 7 | 8 | 9 | 10 |
| X |
Tools and materials needed:
| Phillips screwdriver |
| 10mm socket wrench |
| Hyundai Santa Fe cabin air filter |
Time to install item:
| Total time for mod: | 15-20 min |
Source, item and packaging
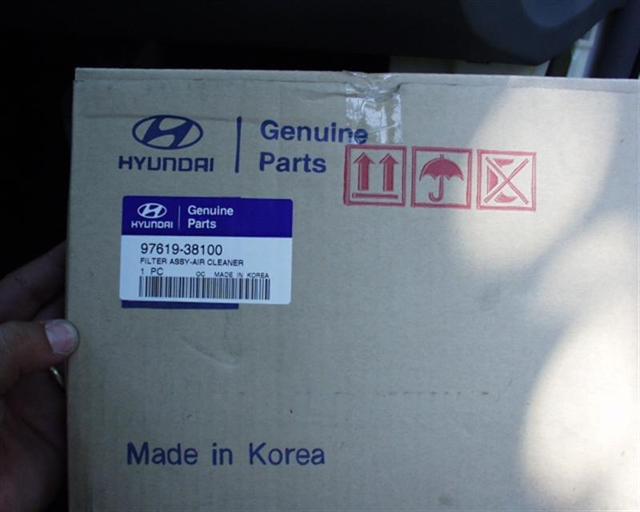 |
The Cabin Air Filter needed
for this modification is a genuine Hyundai OEM part made for the Hyundai
Sonata.
The part number for the Cabin
Air Filter is as follows... These filters can be obtained at any Hyundai dealership, even cheaper if purchased online through the Hyundai Parts Online and Hyundai Accessory Mall website. A few more sites are available on this page. |
|
 |
The Cabin Air Filter is shown here with its part number. | |
|
For those that are not in the
United States and do not have access to obtain the above filter such as
Canadian Owners, you can purchase any furnace filter which are usually sold
in any hardware store with the size of 406 mm by 508 mm and 25 mm thick. Just cut it into four pieces. Each piece would be 203 mm by 254 mm and wedge it into place. (Tip provided by Santa Fe Forum member congo99.) |
Step 1: Accessing the Cabin Air Filter Housing
 |
The Cabin Air
Filter housing is located behind the Glove Box. The Glove Box needs to be
temporarily detached to gain access to the cabin air filter housing. Open the front passenger door all the way and place the passenger seat to the rear most position. This will give you plenty of room to work in the immediate area. To the right of the glove box is a side molding. This side molding is attached by clips and a screw. Remove this screw. |
|
 |
Gently pull
the side molding towards you. It should come off with no problem. This picture also shows the pin that holds the elastic cable. This elastic cable prevents the glove box from going to far. |
|
 |
This picture shows the elastic cable and the tape securing it. Take off the tape and place it elsewhere on the glove box. | |
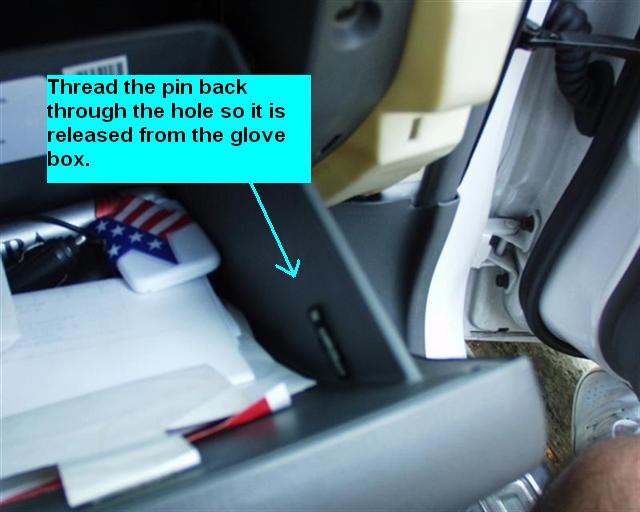 |
Carefully
thread the pin through the hole so it is released from the glove box.
|
|
 |
Bend the left and right sides of the glove box inward to release it from the stop points. This will allow the glove box to be fully extended. (Make sure the glove box is empty.) | |
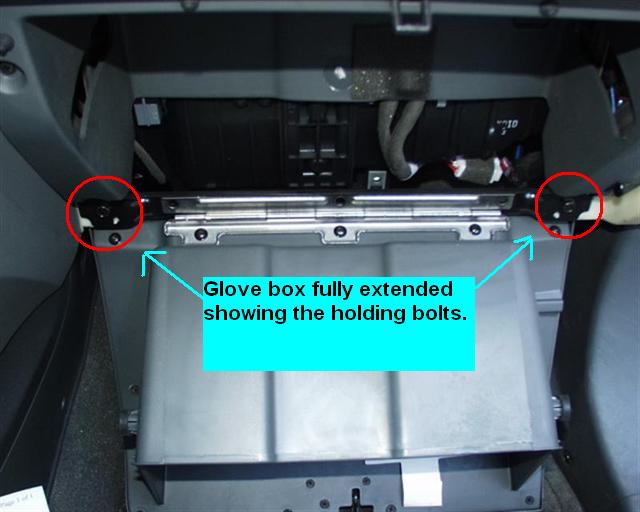 |
With the glove box fully extended, you can see the bolts that need to be removed. Remove them with the 10mm socket wrench. Gently pull towards you the glove box to detach it from the area. |
|
 |
With the
lower part of the glove box removed, you will need to remove the upper part
which is held by 4 screws. Remove these 4 screws. |
|
 |
Carefully
dislodge the upper glove box molding. Be aware that it is still connected to
the console by the glove box light switch wires. You will need to place the
upper glove box carefully towards the door or the wires will disconnect. You can disconnect the wires if you wish, but remember that the black wire is on top and the blue one is attached to the lower pin. |
|
Step 2: Remove existing filter
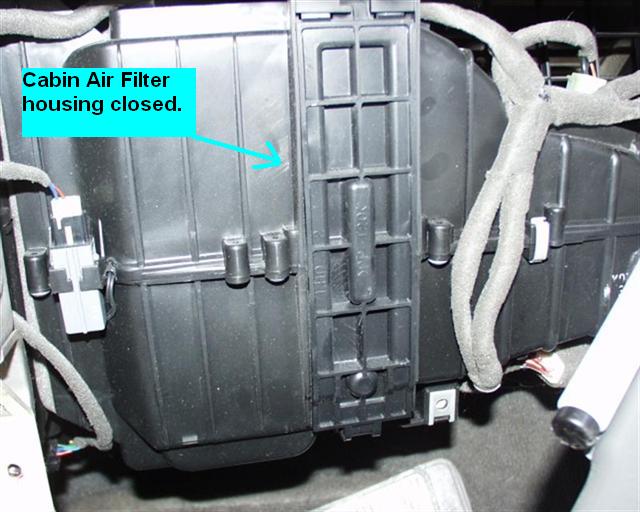 |
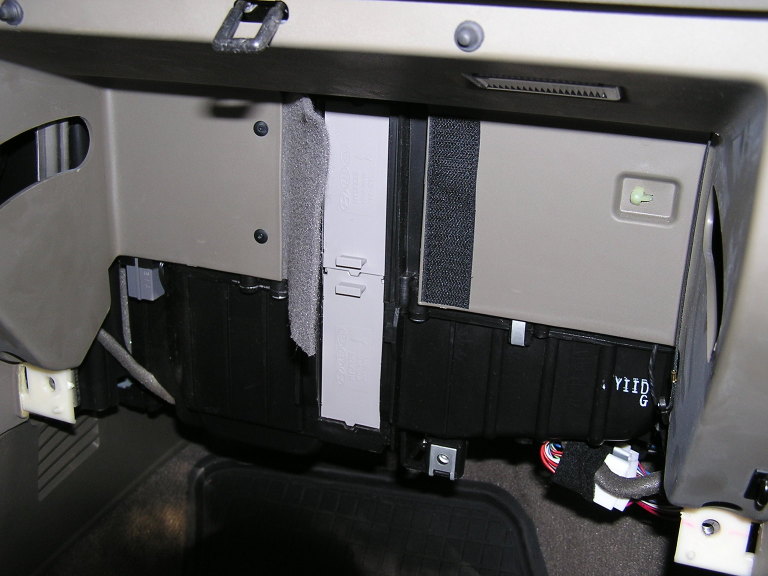
Pre-2003 Models With both the upper and lower glove box moldings out of the way you can see the Cabin Air Filter housing and its cover. Remove the cover by unclipping it from the bottom. |
|
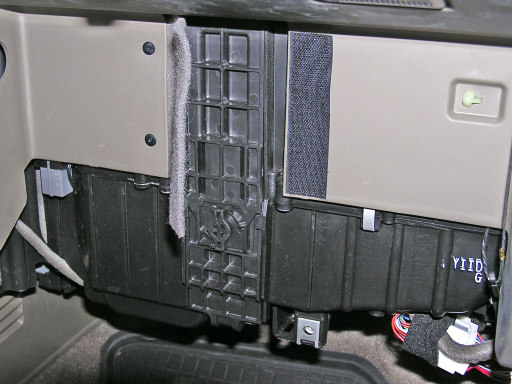 |
Post-2003 + Models Santa Fes' now have a two piece retainer cover. Remove with a half twist of the center tee bolt to free the top half, bottom half unsnaps at bottom and slides down and out. |
|
 |
Post-2003 + Models Retainer cover removed. |
|
Step 3: Remove existing filter
 |
If you have
an existing filter in the housing just pull it out. If no filter exists,
proceed to step 2. This picture shows the filter after one year. (I think I will replace it a bit more often like every 6 months). |
|
 |
Another view side by side. |
Step 4: Attaching the new Cabin Air Filter.
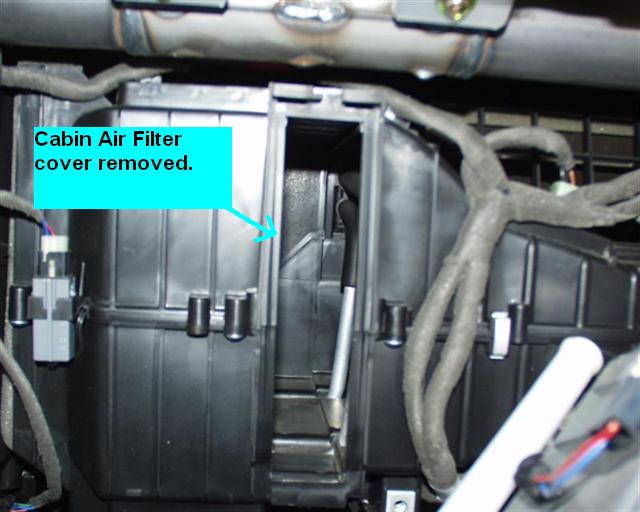 |
This picture shows the cover removed and the inner area of the housing. | |
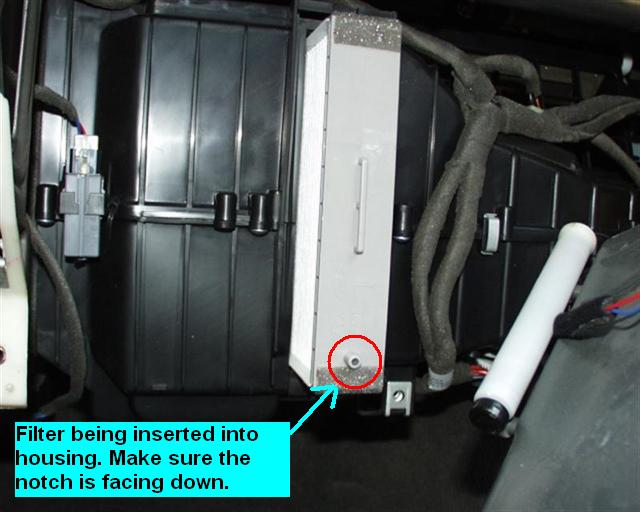 |
Take your filter and inserted into the housing. Make sure that the filters' notch is towards the bottom, otherwise the filter housing cover will not close. | |
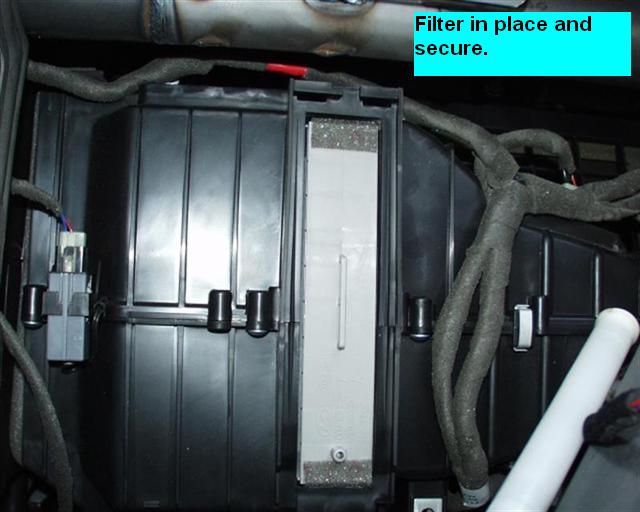 |
Filter should
now be fully inserted and seated. Reattach the filter cover and perform the Step 1 in reverse order to reattach all the parts. |
|
 |
On the Post 2003 + models, the two piece filter also slides right in. |
Warranty notes:
|
Most US Dealerships do not know that there is a cabin air filter housing,
much less have a genuine Hyundai part available that will fit. (The reason
it fits for those that do not know is because the Santa Fe and the Sonata
share numerous parts, and the housing part number is the same for both
vehicles.) Therefore, since YOU are installing this filter, then YOU the
modifier have to maintain this filter. The filter should last for a long
time, but naturally should be inspected and or replaced at certain
intervals. I would suggest at the same time that you change your regular
engine air filter. This will prevent the filter getting much too dirty and
possibly making the Air Conditioning evaporator (the part that gets cold)
freezing up from the lack of air flow possibly causing damage, (thanks
congo99 for that tip), then it would be an expense not covered under and
void the warranty. So stay on top of it at a regularly timed schedule and
all should be fine. Enjoy your fresh cabin air. |
Additional notes and Part Numbers:
| The Hyundai Sonata
GLS (2004) and the XG350 come standard with an onboard cabin air filter. The
other models, Accent, Elantra, Santa Fe and Tiburon also include the
compartment for the interior cabin air filter. Hyundai
recently (as of 8/15/2003) mentioned in their sales newsletter that
their service department can install an air filter on these vehicles as
well. Below are the parts numbers for these cabin filters in case you wanted
to do it yourself as well, just order the part and save yourself some money.
I'm listing the parts number for all models in case you
also own other Hyundai models. Note: Any Santa Fe made after March 29th, 2003 uses the 2 piece cabin air filter like the Sonata. The Hyundai Webtech also has a TSB about this. TSB # 03-97-003 |
MY = model year
Santa Fe
2001 MY: 97619-38100
2002 MY: 97619-38100
2003 MY: 97619-38100 or 97619-3D000 (after March 29th, 2003)
2004 MY: 97619-3D000
2005 MY: 97619-3D000
This site was last updated 02/20/06